


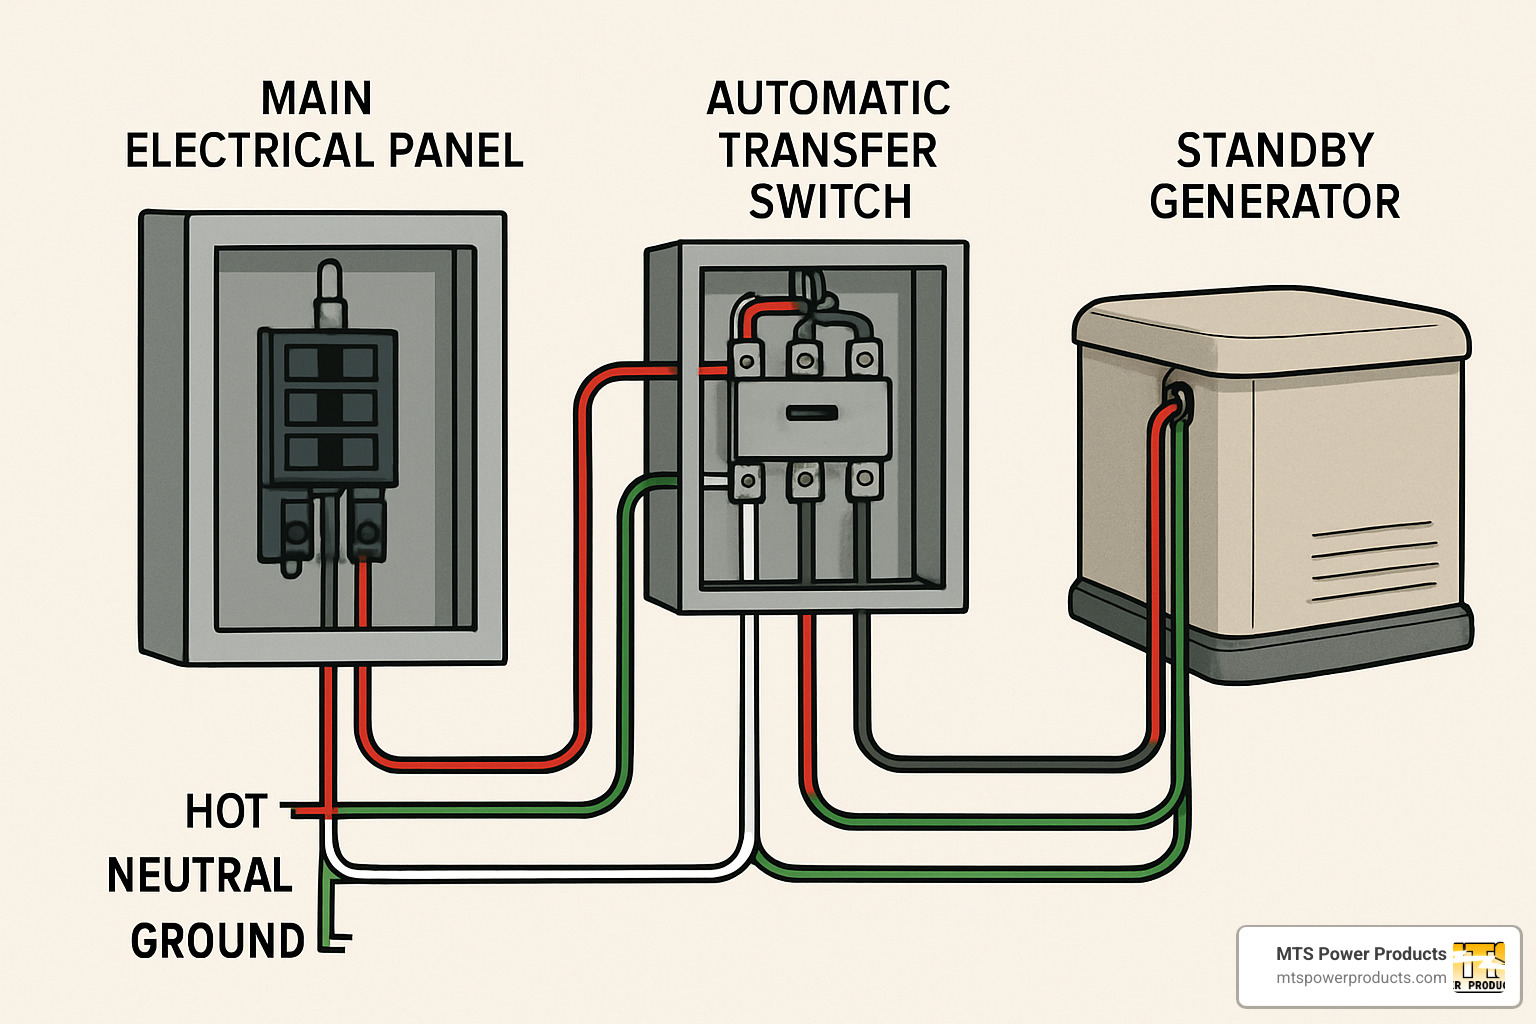
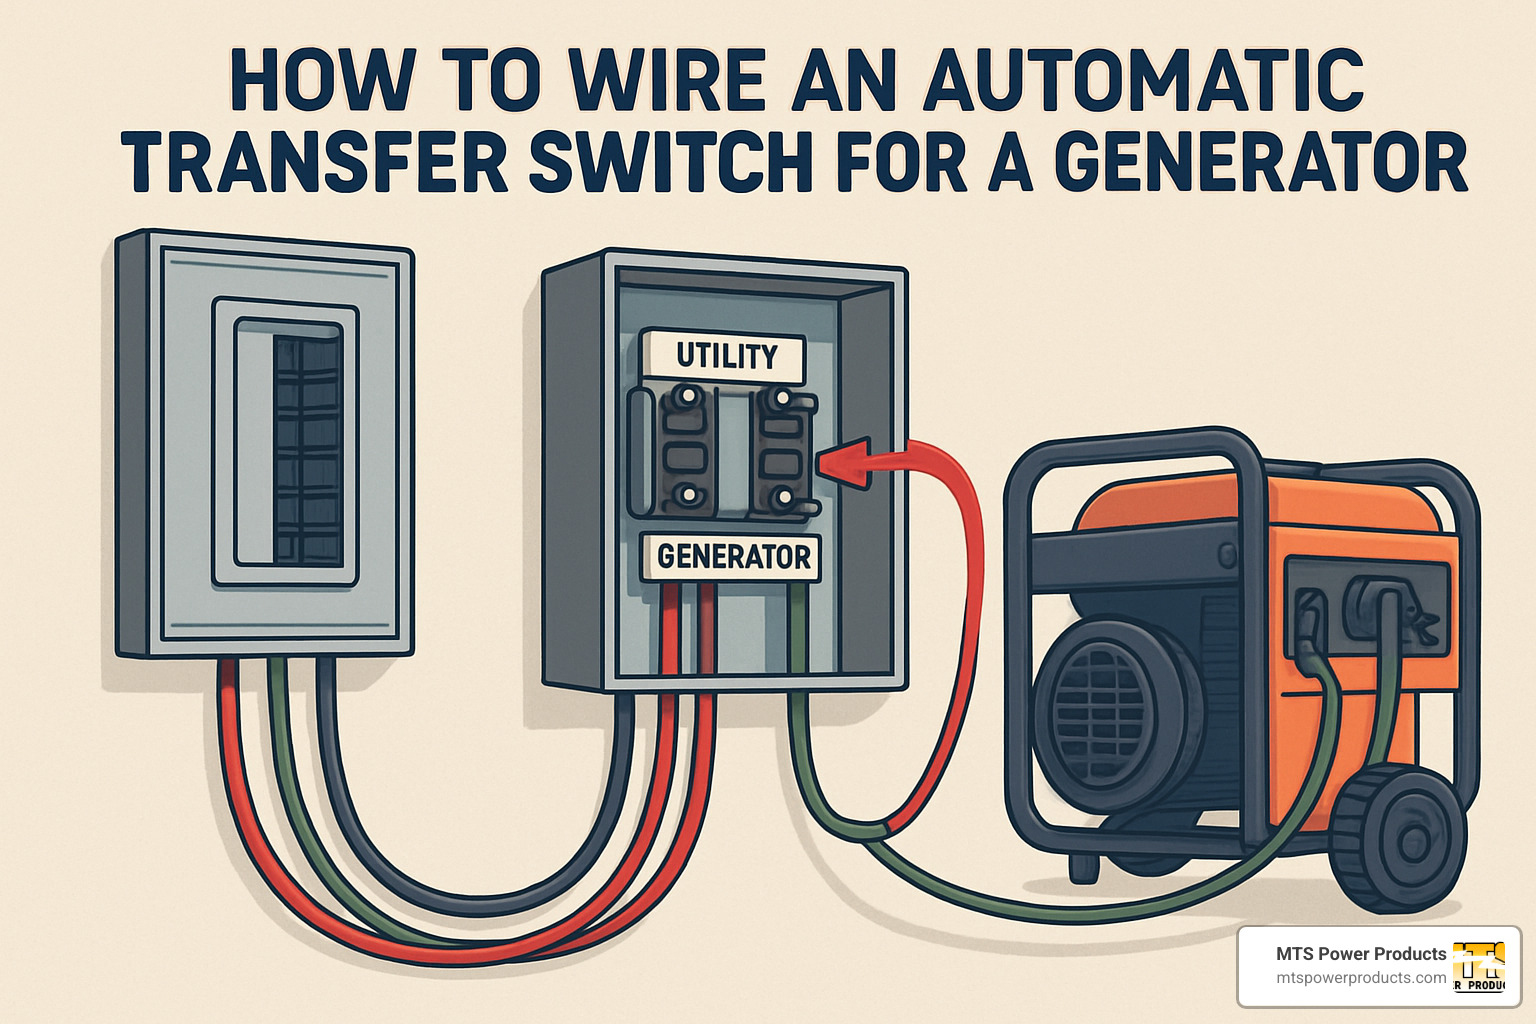
How to wire an automatic transfer switch for a generator is a critical skill for ensuring your home or business stays powered during outages. For those who need a quick answer, here’s the essential process:
When storms knock out power or grid failures leave you in the dark, a properly installed automatic transfer switch (ATS) becomes your silent guardian. This critical component works behind the scenes to detect power outages and seamlessly switch your electrical system from utility power to your backup generator—without you lifting a finger.
As one experienced installer noted in our research, “A properly installed automatic transfer switch can reduce generator installation time and cost by up to 50% compared to traditional transfer switch installations.” This efficiency comes from eliminating the need for manual intervention during power transitions.
Whether you’re protecting your family from hurricane-related outages in South Florida or ensuring your manufacturing plant maintains production during grid instability, understanding how to wire an ATS correctly is essential for both safety and functionality.
Incorrect installation—particularly improper neutral/ground bonding—can result in dangerous stray currents and potential shock hazards. In fact, this is one of the most common wiring errors made during installations.
Let’s explore how to properly wire your automatic transfer switch to ensure your generator provides safe, reliable power exactly when you need it.

Ever wonder what’s happening inside that box that keeps your lights on when the power goes out? Let’s peek behind the curtain of your automatic transfer switch – it’s more than just a fancy power switch!
At the heart of every ATS are contactors – think of them as heavy-duty electrical relays built to handle the full current of your home or business. These workhorses are controlled by intelligent sensing electronics that keep a constant eye on your utility power. When these sensors detect a blackout or dangerous voltage drop, they spring into action.
“The completely automatic transfer switch monitors incoming voltage from the utility line, around the clock,” explains one of our technical specialists at MTS Power Products. “When it senses a problem, it sends a start signal to your generator, waits for it to reach proper voltage and frequency, then transfers your electrical loads.”
One of the most important safety features in quality transfer switches is what we call break-before-make operation. This isn’t just technical jargon – it’s a critical safeguard that ensures the connection to utility power is completely broken before connecting to generator power. This prevents dangerous backfeeding into utility lines that could harm lineworkers trying to restore your neighborhood’s power.

Depending on your home’s needs, you might choose between:
The sequence of operation in a typical ATS is like a well-rehearsed dance:
First, your ATS constantly monitors utility power. When it detects an outage, it immediately sends a generator-start-signal through the control cable. Your generator fires up and stabilizes (usually taking 10-30 seconds). The ATS then breaks connection to utility power before making connection to generator power – that break-before-make safety we mentioned earlier.
When utility power returns, your ATS doesn’t rush things. It monitors the returning power for stability (typically 1-5 minutes) before switching back. Once satisfied, it breaks the generator connection, reconnects utility power, and sends your generator a cooldown and shutdown signal.
One particularly tricky aspect is neutral-switching. As one electrical engineer noted in our research, “A transfer switch with a solid neutral (non-switching) requires the generator’s neutral-ground bond to be removed to prevent parallel neutral paths, which is a modification often performed by electricians.” This might sound technical, but getting it right prevents dangerous stray currents in your electrical system.
For more detailed information about the operation and benefits of automatic transfer switches, visit our comprehensive guide on Automatic Transfer Switches.
Getting ready to install your automatic transfer switch? Let’s start with some thoughtful planning. After all, a properly sized system isn’t just about convenience—it’s about safety and reliability when you need power most.
First things first: you’ll need to know exactly how much power you’re planning to use during an outage. Grab a notepad and walk through your home, listing all those must-have appliances and systems.
Many appliances (especially those with motors) need a power boost to get going. Your refrigerator might hum along at 700 watts, but when it first kicks on? It could demand up to 2,100 watts! Similarly, that well pump keeping your water flowing might need nearly 4,000 watts at startup while using only 2,288 watts during normal operation.
“I always tell homeowners to add up their running watts, then factor in the largest startup surge they’ll need,” explains one of our technicians at MTS Power Products. “That’s the bare minimum your system should handle.”
Transfer switches come in different sizes, typically measured in amps. Here’s what you’ll commonly find for homes:
| ATS Rating | Generator Size | Typical Application | Approximate Cost |
|---|---|---|---|
| 30 Amp | 5-8 kW | Small home, essential circuits | $300-$500 |
| 100 Amp | 8-17 kW | Standard home, most circuits | $500-$1,200 |
| 200 Amp | 20+ kW | Large home, whole-house backup | $1,000-$2,500 |
Most homes do well with a 100-amp transfer switch paired with a generator in the 8-17kW range. This setup handles most household circuits comfortably without breaking the bank.
Choosing the right wire size isn’t just about making connections—it’s about safety. The National Electrical Code (NEC Article 702) provides clear guidelines for standby systems:
For a 30-amp ATS, you’ll need #10 AWG copper conductors. Moving up to a 100-amp system? Plan on using #3 AWG copper or #1 AWG aluminum. For whole-house 200-amp systems, you’re looking at hefty #2/0 AWG copper or #4/0 AWG aluminum.
Using undersized wire isn’t just a code violation—it’s a fire hazard waiting to happen. When in doubt, go bigger.
Here’s where many DIYers get tripped up: neutral bonding. Your generator falls into one of two camps:
“Incorrect neutral/ground bonding between generator and transfer switch is probably the number one wiring mistake I see,” notes our lead installer. “It creates dangerous stray currents that can shock you when you least expect it.”
If your generator has a bonded neutral, you’ll need a transfer switch that switches the neutral conductor along with the hot legs. Alternatively, we can modify your generator to remove that neutral-ground bond—just ask!
Don’t forget proper grounding! NEC Article 250 requires a proper grounding electrode system. In most cases, you’ll connect to your home’s existing ground, but sometimes a new ground rod installation is necessary.
The proper ground connection isn’t just about meeting code—it’s about directing fault currents safely away from people and equipment when something goes wrong.
At MTS Power Products, we’ve helped countless South Florida homeowners match the perfect generator and ATS combination to their needs. Our experience with everything from hurricane-prone coastal homes to critical business applications means we can help you get it right the first time.
The time to plan your backup power system is long before the storm warnings start. Taking the time now to properly size your equipment will pay dividends when the lights go out and your system kicks in without a hitch.
Now that we understand the fundamentals, let’s dive into the step-by-step process of how to wire an automatic transfer switch for a generator. This section will provide a comprehensive guide to ensure your installation is safe, effective, and compliant with electrical codes.
Before rolling up your sleeves, gather everything you’ll need for a smooth installation. Trust me, there’s nothing worse than being halfway through your project only to realize you’re missing that crucial tool!
You’ll need safety equipment like insulated gloves and safety glasses to protect yourself, along with a reliable voltage tester to verify power is truly off. Don’t forget your lockout/tagout kit – safety first, always!
For the actual work, gather your wire strippers, screwdrivers (both types), socket set, and a calibrated torque wrench – those connections need to be just right! You’ll also want a level, tape measure, and label maker to keep everything organized.
For materials, besides your appropriately sized transfer switch, you’ll need the right gauge wire (typically #6 THHN for many residential applications), EMT conduit with fittings, and anti-oxidant paste if you’re working with aluminum connections. Don’t forget wire connectors, electrical tape, and mounting hardware.
As one of our Miami installers likes to say, “The right tools make the job go twice as fast and ten times safer.” I couldn’t agree more!
Safety First: Turn off all power to your electrical system at the main disconnect. This isn’t just a suggestion – it’s absolutely essential. Use your voltage tester to verify power is truly off before proceeding. Apply your lockout/tagout devices to prevent anyone from accidentally restoring power while you’re working.
I always tell our customers at MTS Power Products, “Even experienced electricians treat every wire as if it’s live.” It only takes one mistake with electricity to have serious consequences, so take your time with safety preparations.
Find a good spot for your transfer switch, ideally within a couple feet of your main panel. This proximity makes for shorter conduit runs and a cleaner installation. Mount it at a comfortable working height – usually about 4-5 feet from the floor.
Use your level to ensure the transfer switch is perfectly vertical (crooked installations not only look unprofessional but can cause operational issues down the line). Mark your mounting holes, drill carefully, and secure the unit firmly to the wall.
Next, you’ll need to create pathways for your wiring. Run appropriate-sized conduit between your main panel and transfer switch, and from the transfer switch to your generator connection point.
Make sure all conduit connections are secure and properly sealed, especially for outdoor installations. As our Florida customers know all too well, moisture is the enemy of electrical connections! A good bead of silicone caulk around outdoor penetrations can save you headaches later.
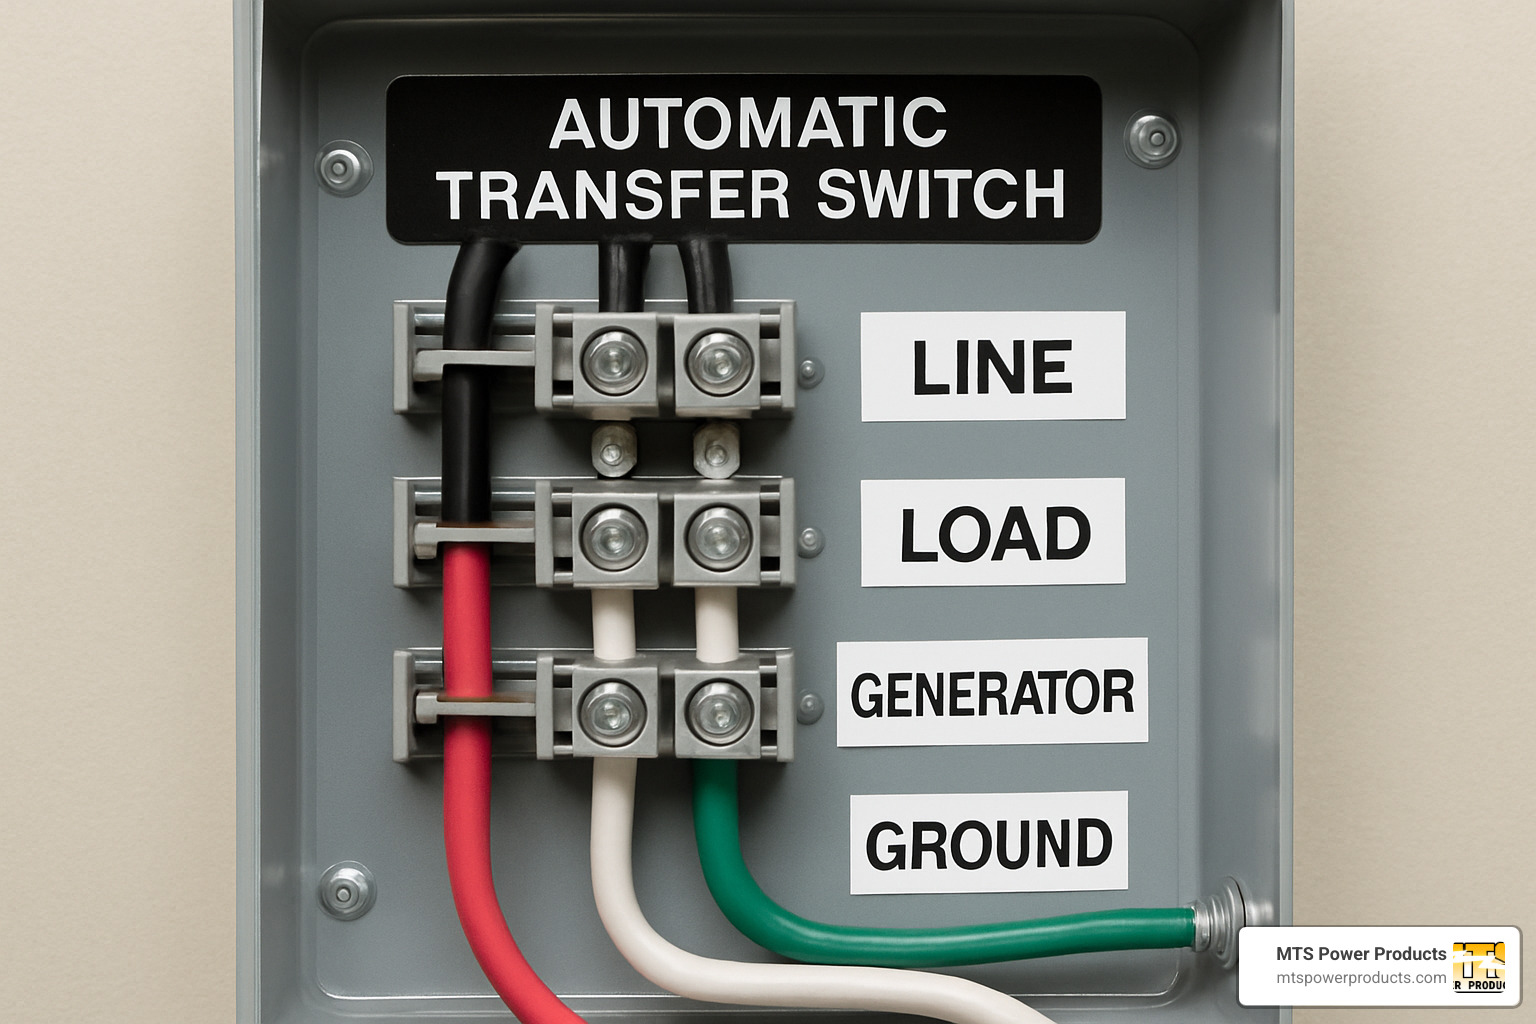
With power still verified off, remove the cover from your main electrical panel. Identify the incoming utility feed, then run appropriately sized conductors through your newly installed conduit to the transfer switch.
Connect these conductors to the terminals marked “LINE” or “UTILITY” in your transfer switch. Be sure to torque these connections to the manufacturer’s specifications – typically around 20 inch-pounds for power connections. Loose connections can lead to overheating and failure.
Now, run conductors from the “LOAD” terminals of your transfer switch to your home’s distribution panel. If you’re setting up whole-house backup, these connections will be substantial. For partial home backup, you’ll connect only selected critical circuits.
Maintaining proper phasing throughout the system is crucial – mixing up your phases can damage equipment or create dangerous conditions. When in doubt, mark your wires clearly with colored tape or labels.
For portable generators, install a weatherproof generator inlet box on your home’s exterior. For permanent standby generators, run conduit directly from the generator to the transfer switch.
Connect conductors from your generator or inlet box to the “GEN” or “EMERGENCY” terminals in the transfer switch. Sizing matters here – a 100 amp transfer switch typically needs a 70 amp double-pole circuit breaker for generators 10kW and above, or a 40 amp breaker for 8kW units.
This step is where many DIYers go wrong, but it’s absolutely critical for safety. How you handle neutral and ground connections depends on your transfer switch type:
For solid-neutral transfer switches (non-switching neutral), connect the neutral from utility, load, and generator to the neutral bus. If applicable, ensure your generator’s neutral-ground bond is removed.
For switched-neutral transfer switches, connect each neutral (utility, load, and generator) to its respective terminal. The transfer switch will handle switching the neutral along with the hot conductors.
For ground connections, connect all equipment grounds to the ground bus and ensure it’s properly bonded to your grounding electrode system. When in doubt about this step, consult a professional – improper grounding is a major safety hazard.
For automatic operation, you’ll need control wiring between your transfer switch and generator:
Locate the control terminal block in your transfer switch and identify the generator start/stop terminals. Run low-voltage control wire (usually 18-22 AWG) between the transfer switch and generator, connecting to the corresponding terminals on your generator’s control panel.
Many of our customers at MTS Power Products opt for Express Install Kits, which can cut installation time dramatically. These kits include pre-wired conduits that allow pre-wiring before generator delivery – a real time-saver!
Before restoring power, double-check all your connections. Verify they’re tight and properly torqued. Confirm proper separation between neutral and ground in appropriate locations. Make sure all wire connections are secure and properly insulated.
Check that all conduit connections are tight and sealed, then replace all covers and panels. This careful verification step can prevent issues that would be much harder to troubleshoot later.
Now for the moment of truth! Remove your lockout/tagout devices and restore utility power. Verify everything operates correctly with utility power first.
Next, simulate a power outage by turning off the main breaker. Your generator should start automatically (or start it manually if you don’t have automatic controls). Confirm the transfer switch operates correctly and that all connected loads receive power.
Finally, restore utility power and confirm proper re-transfer. Your system should seamlessly switch back to utility power after a short delay, then cool down and shut off your generator.
For more information about our McPherson Controls line of automatic transfer switch controls, visit our Automatic Transfer Switch Controls page.
If you’re in South Florida and need professional assistance with your transfer switch installation, MTS Power Products is just minutes from Miami International Airport. Our team has helped countless homeowners and businesses with proper transfer switch wiring, ensuring safe, reliable backup power when it matters most.
Let’s talk about the elephant in the room – neutral and ground connections. This is where many DIYers and even some professionals stumble, creating situations that range from annoying to downright dangerous.
I like to think of this common issue as a workplace drama. Imagine two department managers who both think they’re in charge of the same team. That’s essentially what happens when both your generator and electrical system have neutral-to-ground bonds. Electricians often chuckle about this as the “Two Bonds Bickering” problem.
As one of our more colorful installers puts it, “When a solid-neutral transfer switch meets a bonded-neutral generator, it’s like having two captains trying to steer the same ship—dangerous currents end up flowing where they shouldn’t.” These parallel paths for neutral current create stray currents on ground conductors, which can lead to electric shock hazards and equipment damage.
Have you ever had a party where two guests just can’t get along? That’s what happens with GFCIs and improperly configured transfer switches. Many modern generators come with built-in GFCI protection on their outlets. When these generators connect to a transfer switch with a solid neutral, those GFCI devices often trip immediately.
Why? They’re detecting current flowing on the ground path – exactly what they’re designed to protect against. Unfortunately, in this case, it’s a false alarm caused by your wiring configuration, not an actual safety hazard.
You have three main solutions to this headache:
At MTS Power Products, we often recommend option one for most homeowners, as it’s typically the simplest solution without modifying equipment.
The National Electrical Code might not be bedtime reading for most folks, but Article 250 is crucial when installing your transfer switch. Here’s what you need to know:
The one-bond rule is critical – your neutral must be bonded to ground at only one point in the entire system. Think of it as the electrical version of “too many cooks spoil the broth.”
For most generator setups (technically called “separately derived systems”), that neutral-to-ground bond should happen at the first disconnect means. This ensures that ground fault current has a clear, single path back to the source.
“A transfer switch that only switches hot legs but leaves the neutral solid can conflict with a bonded-neutral generator, causing stray neutral currents,” explains our lead engineer at MTS Power Products. “It’s like trying to direct traffic with two different people giving contradictory signals.”
Before you even pick up a screwdriver, check with your local building department about permits. I know, paperwork isn’t fun, but it’s far better than having to tear out completed work because it doesn’t meet code.
Most jurisdictions will want to see:
– Your electrical permit application
– Load calculations showing your system is properly sized
– A single-line diagram of your proposed installation
– The manufacturer’s installation instructions
– Your installation at various stages for inspection
When the inspector arrives (and they will), they’ll typically check for proper mounting and clearances, correct wire sizing and protection, appropriate grounding and bonding, proper labeling, and overall workmanship. Think of it like having a very picky houseguest – they’ll notice everything!
At MTS Power Products, we understand these complexities, which is why our McPherson Controls line is designed with code compliance in mind. We’ve done the hard thinking so your installation and inspection process goes smoother.
For those who want to dive deeper into the science behind transfer switch wiring, check out this detailed guide on Automatic and Manual Changeover Transfer Switches.
When it comes to how to wire an automatic transfer switch for a generator, getting the neutral and grounding right isn’t just about passing inspection – it’s about keeping your family safe during that next power outage.
Today’s home backup power systems have come a long way from the simple generator setups of the past. Many homeowners are now combining traditional generators with solar panels and battery storage—creating truly resilient power systems that can keep the lights on no matter what happens to the grid.
Integrating these diverse power sources with your automatic transfer switch requires some thoughtful planning, but the peace of mind is absolutely worth it.
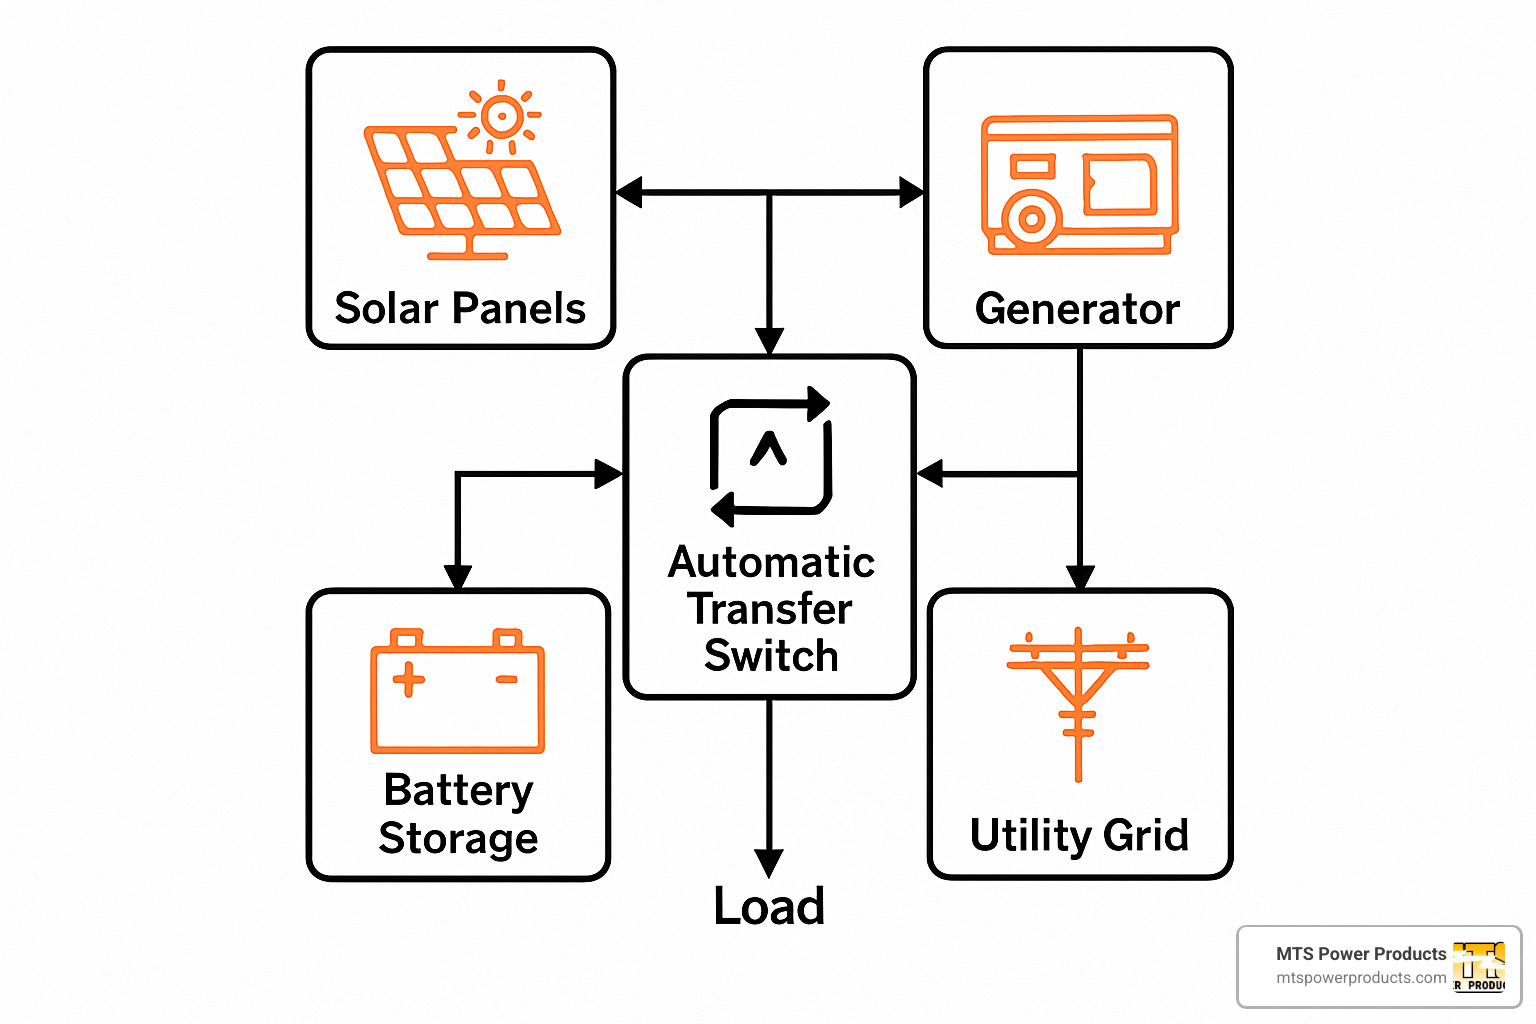
If you’re considering a modern hybrid power system, you’re probably looking at a combination of several power sources:
“I used to worry about power outages constantly,” shares one of our Florida customers. “Now with my solar panels, battery bank and generator all working together through my ATS, I barely notice when the grid goes down.”
A complete hybrid power system typically includes utility power (your normal grid connection), a backup generator, solar panels, battery storage, and inverter systems that tie everything together. In this more complex setup, your automatic transfer switch becomes part of a sophisticated power management orchestra.
One of the most convenient features of modern power systems is the inverter auto-start capability. Rather than having your generator run continuously during an outage (wasting fuel and creating noise), your system can be smarter about when to use each power source.
For instance, your system might:
– Monitor your battery levels throughout the day
– Automatically start your generator when batteries get low (perhaps overnight or during cloudy periods)
– Use the generator to recharge your batteries to an optimal level
– Shut down the generator when the batteries are sufficiently charged
This intelligent operation saves fuel, reduces noise, and extends the life of your generator. As one renewable energy specialist noted, “Using the inverter’s built-in auto-gen-start feature can eliminate the need for a traditional ATS” in some setups, though many homeowners prefer the redundancy of having both systems.
Not all electrical loads are created equal. During a power outage, your refrigerator is clearly more important than your entertainment system. Advanced transfer switch systems understand this reality.
Our McPherson Controls line includes sophisticated load management that can automatically prioritize your critical systems. When running on generator or battery power, these smart controls can:
Prioritize essential loads like refrigeration, medical equipment, and climate control while temporarily disabling power-hungry devices that aren’t urgently needed.
Sequentially add loads to prevent overwhelming your generator with a sudden power demand when it first starts up.
Monitor your generator’s capacity in real-time and intelligently manage which appliances receive power based on available capacity.
“The load management feature paid for itself during our first major outage,” one customer told us. “Instead of tripping the generator breaker when too many appliances kicked on at once, the system smoothly managed everything.”
Remember the days of wondering if your generator was working properly during an outage? Those days are gone. One of the most welcome advances in modern backup power is comprehensive remote monitoring.
With MTS Power Products’ McPherson Controls line, you can keep an eye on your entire power system from anywhere with internet access. Our remote monitoring systems let you:
Check system status from your smartphone or laptop whether you’re at work or vacationing across the country.
Receive instant alerts about power outages, generator status changes, or any issues requiring attention.
Remotely test your generator on a schedule that works for you, ensuring it’s ready when you need it most.
Review historical data on your power usage, outage frequency, and system performance to make informed decisions about future upgrades.
“The ability to monitor your backup power system remotely provides peace of mind, especially for those who travel frequently or maintain multiple properties,” explains our product development manager at MTS Power Products.
The energy landscape is changing rapidly. When planning your ATS installation today, it’s wise to consider what you might want to add tomorrow.
Leave some extra space in your electrical room for additional equipment like battery banks or upgraded controllers. Choose systems with expandable capabilities that can grow with your needs. And when running conduit, consider installing slightly larger sizes than currently needed—it’s much easier to pull larger wires later than to replace conduit buried in your walls.
At MTS Power Products, we design our systems with this kind of scalability in mind. You can start with a basic setup now and expand as your needs (and budget) grow. Many of our customers begin with a simple generator backup system, then add solar and batteries over time.
For more detailed information about our advanced ATS controllers that make this integration seamless, visit our ATS Controllers page to explore the possibilities.
Let’s face it—your automatic transfer switch is a bit like insurance. You hope you never need it, but when you do, it absolutely must work flawlessly. That’s why proper testing and regular maintenance aren’t just good ideas—they’re essential.
After you’ve completed your installation, don’t just flip the switch and hope for the best. A proper commissioning process involves several critical tests:
First, run a no-load test to verify the basic operation without risking your connected equipment. This is where you’ll confirm that your transfer switch correctly senses when utility power disappears, sends the start signal to your generator, and follows the proper transfer sequence. Think of it as a dress rehearsal before the main performance.
“I always tell my customers to watch that first no-load test carefully,” says our service manager at MTS Power Products. “It’s your first glimpse of how the system will behave when you’re not there to babysit it.”
Next comes the load bank test—essentially a controlled stress test for your system. By connecting a load bank (specialized equipment that simulates electrical loads), you can verify your generator’s performance under realistic conditions. This test reveals whether your system maintains stable voltage and frequency when working hard, and whether it stays within safe temperature ranges.
Finally, perform a functional test with your actual equipment connected. Simulate a power outage and watch how everything responds. Does your generator start promptly? Does the transfer switch operate smoothly? Do all your connected systems receive power? When utility power returns, does everything transfer back correctly?
These initial tests provide peace of mind and confirm that your investment will protect you when you need it most.
Even the best-installed system needs regular attention to stay reliable. Here’s what an effective maintenance schedule looks like:
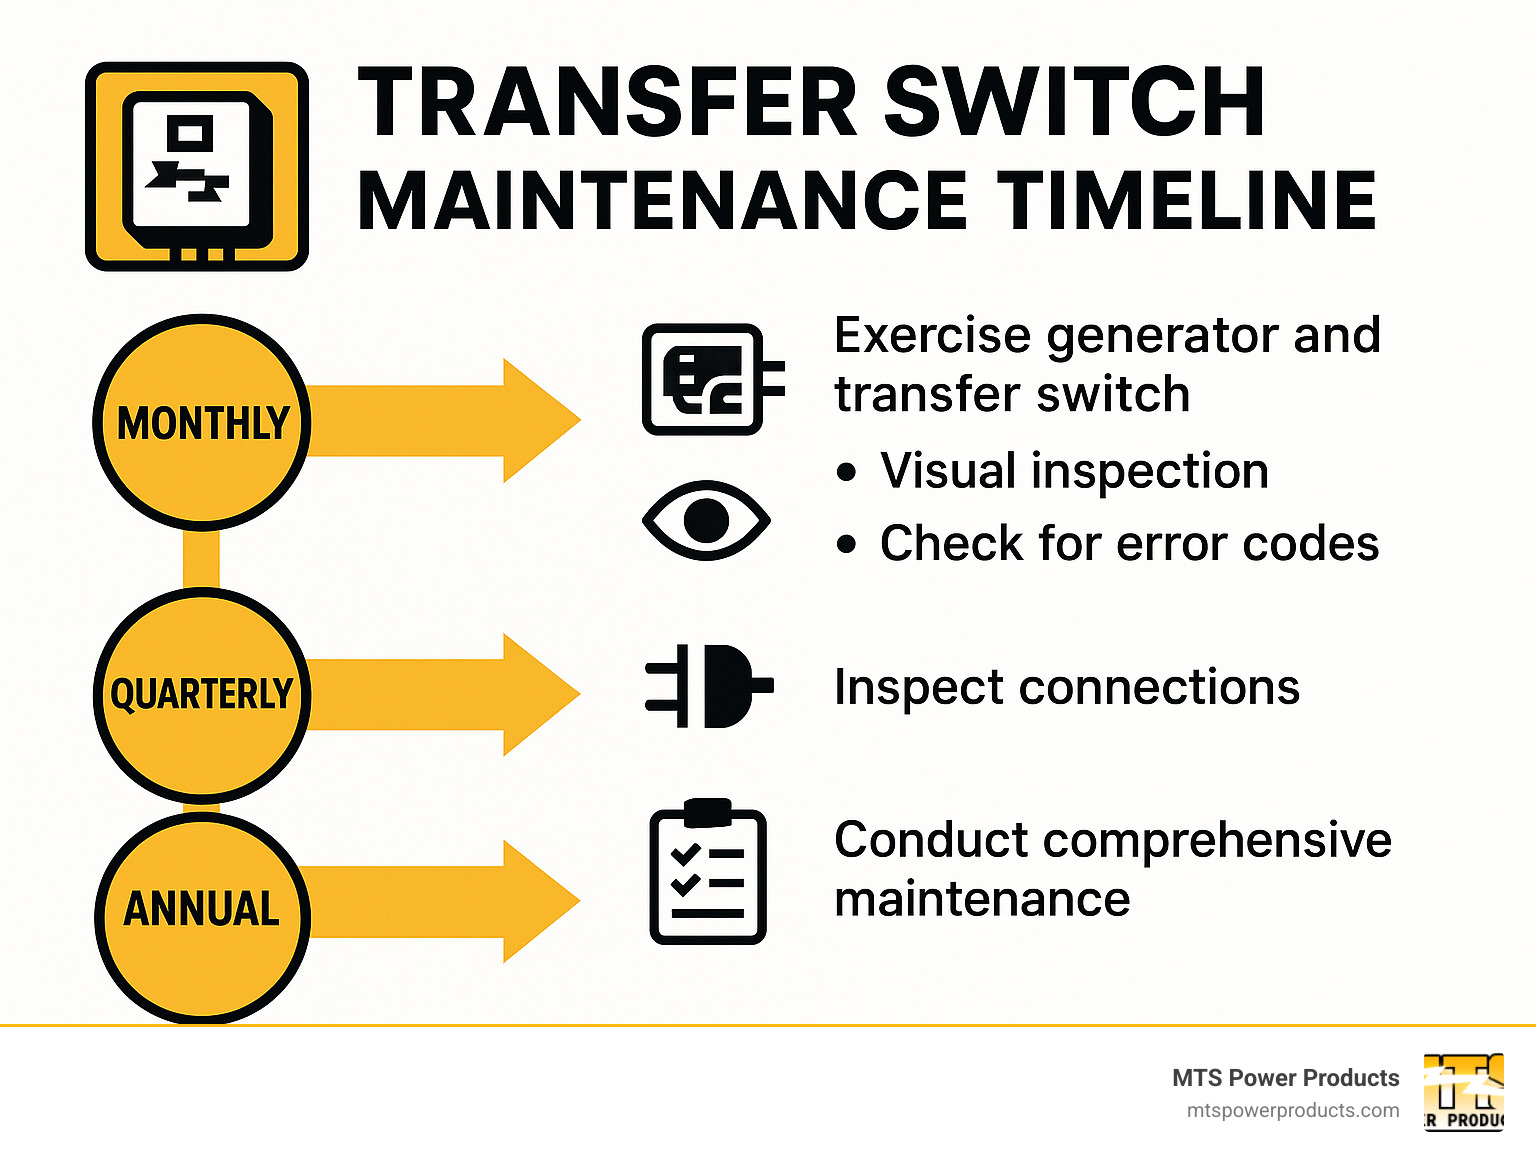
Monthly care is like checking your car’s oil—simple but crucial. Most modern systems will automatically exercise the generator and transfer switch monthly, but you should still visually inspect for any damage or warning indicators. Check your generator’s fuel levels and battery condition too—a generator with an empty tank or dead battery won’t help during an outage!
Annual inspections dig deeper. Schedule a professional to put your system through its paces under load, check all electrical connections for tightness, clean enclosures, verify control system operation, and lubricate any moving parts. This yearly attention helps catch small issues before they become big problems.
Every three to five years, plan for more comprehensive service. This includes replacing wear items, testing all components thoroughly, updating firmware if applicable, performing insulation resistance testing, and inspecting or replacing contacts. Think of this as your system’s periodic “physical exam.”
“Monthly testing and annual professional inspection are the minimum recommended maintenance for any automatic transfer switch system,” explains our lead technician. “This ensures your system will perform reliably during an actual emergency.”
Don’t underestimate the value of good record-keeping. Maintain a dedicated log that includes dates and times of service, tests performed and their results, parts replaced, observations, and the name of the service technician.
These records aren’t just paperwork—they’re a diagnostic tool that can reveal patterns and help troubleshoot issues. They’re also invaluable for warranty claims and can even increase your property’s value by demonstrating responsible maintenance.
Even with perfect maintenance, parts occasionally fail. Having a small inventory of critical spares can mean the difference between a minor inconvenience and an extended outage. Consider keeping control fuses, indicator lamps, and critical control relays on hand.
Most manufacturers, including our McPherson Controls line at MTS Power Products, can recommend a specific spare parts kit for your model. The small investment in spare parts pays big dividends when you need them.
Your automatic transfer switch is the guardian of your power supply during emergencies. With proper testing and consistent maintenance, it will stand ready to protect your home or business whenever the lights go out—giving you one less thing to worry about when storms or grid failures strike.
Choosing the right breaker size for your automatic transfer switch is a bit like finding the right shoes—it needs to be a perfect fit for safety and performance.
The breaker size primarily depends on your generator’s output capacity and transfer switch rating. For most residential installations, you’ll follow these general guidelines:
I spoke with one of our installation specialists at MTS Power Products who explained, “A 100 amp transfer switch is typically protected by a 70 amp double pole circuit breaker for generators 10kW and above, and a 40 amp breaker for 8kW units. Getting this right is crucial for both safety and performance.”
Always check your specific generator and transfer switch documentation, as requirements can vary between manufacturers. When in doubt, consult with a professional—it’s better to be safe than sorry!
This is perhaps the most common question we hear, and I understand the appeal of DIY projects. While some homeowners with extensive electrical experience might technically be capable of installing an automatic transfer switch, I strongly recommend hiring a licensed electrician.
Why? Well, there are several compelling reasons:
First and foremost is safety—working with high-voltage electrical systems is inherently dangerous, even for those with some experience. One of our Miami customers learned this the hard way when attempting a DIY installation that resulted in a minor electrical shock.
Code compliance is another critical factor. A licensed electrician understands local electrical codes and requirements that might not be obvious to homeowners. As one of our installation experts notes, “Each county in South Florida has slightly different requirements for generator installations—what works in Miami-Dade might not pass inspection in Broward.”
Your warranty protection could also be at risk. Many manufacturers, including our McPherson Controls line, require professional installation to maintain warranty coverage.
Most jurisdictions require permits and inspections for this type of work, and navigating this process can be challenging without professional assistance.
Finally, there’s the matter of liability—improper installation could potentially lead to property damage, injury, or worse.
As one customer wisely commented in our feedback survey, “Non-licensed electricians should avoid working inside the main service panel. The money I spent on professional installation was the best insurance policy I could buy.”
The cost of professional installation (typically $500-$1,500) is a worthwhile investment in safety and reliability. At MTS Power Products, we can recommend qualified installers in the South Florida area who are familiar with our equipment.
Think of your automatic transfer switch like a fire extinguisher—you hope you’ll never need it, but when you do, it absolutely must work perfectly. Regular testing and maintenance are essential to ensure reliability when you need it most.
For optimal performance, follow this straightforward maintenance schedule:
Monthly: Allow your system to complete its automatic exercise cycle (typically programmed into the controller). This keeps everything lubricated and functioning properly.
Quarterly: Take a few minutes to perform a visual inspection and operational check. Look for anything unusual—rust, loose connections, or warning lights.
Annually: Schedule a comprehensive inspection by a qualified technician. This should include verification of all connections, testing of transfer operation, inspection of contacts and moving parts, control system testing, and battery condition assessment (if applicable).
“Perform regular maintenance on both the generator and transfer switch,” advises our service department at MTS Power Products. “And don’t forget safety basics—install carbon monoxide detectors and place the generator at least 20 feet from the home.”
Most manufacturers, including our McPherson Controls line, recommend a complete professional service every 3-5 years or after a specified number of transfer operations, whichever comes first.
One of our long-time customers in Coral Gables shared, “After Hurricane Irma, the homes with well-maintained systems were the ones with reliable power. My neighbor skipped maintenance for years and his system failed right when he needed it most.”
A small investment in regular maintenance can save you from major headaches during an emergency. Our team at MTS Power Products is always available to answer maintenance questions or schedule service for customers in the South Florida area.
Properly wiring an automatic transfer switch for a generator is much more than a technical task—it’s your pathway to peace of mind when storms rage or the grid fails. Throughout this guide, we’ve walked together through the intricate dance of connections and configurations that make up a reliable backup power system.
I’ve met countless homeowners who sleep better at night knowing their refrigerator will keep running, their medical equipment will stay powered, and their families will remain comfortable when the neighborhood goes dark. That confidence comes from knowing their system was installed correctly.
Think of your automatic transfer switch as a silent guardian, constantly watching over your electrical system, ready to spring into action at the first sign of trouble. But like any guardian, it needs proper preparation and care to perform its duty when called upon.
The journey we’ve taken—from understanding the inner workings of transfer switches to the precise steps of installation and the ongoing ritual of maintenance—all serves one purpose: ensuring your lights stay on when others go out.
The most common pitfalls happen in areas that seem minor but have major consequences. Those neutral and ground connections might look like just another wire, but they’re the difference between a system that works safely and one that creates hazards. This is why professional installation isn’t just a recommendation—it’s an investment in your family’s safety.
Your transfer switch is part of a living system that needs regular attention. Monthly tests, annual check-ups, and periodic professional servicing aren’t just maintenance tasks—they’re renewal of your insurance policy against the dark.
Here at MTS Power Products, we don’t just sell equipment—we provide solutions that keep Miami homes powered through hurricane season and businesses operational when competitors are scrambling. Our McPherson Controls line represents the culmination of years of field experience, offering advanced features like remote monitoring that let you check on your system from anywhere, even when evacuated during severe weather.
We’re proud to be part of the South Florida community, with our facility strategically positioned just minutes from Miami International Airport and the Port of Miami. This allows us to serve customers not just locally, but worldwide, delivering custom power solutions where they’re needed most.
The next time storm clouds gather on the horizon, you’ll feel that flutter of concern—it’s natural. But with a properly installed automatic transfer switch connected to your generator, that concern will quickly give way to confidence. You’ve prepared. You’re protected.
For more specialized information about our generator automatic transfer switches and to find the perfect solution for your home or business, visit our Generator Automatic Transfer Switch page.
Don’t wait for the next outage to wish you’d taken action. Your future self—perhaps sitting comfortably with lights on while neighbors search for candles—will thank you for the foresight.